Part 4: Chapter 4 and The War Room Part 4 (Combat Mechanics Explained)

I'm really not sure where this chapter got its title. I mean, the setting of it is the lawless border of Bern. It's not like this is territory being occupied by another country. I guess the local bandits could sort of be said to be occupying it?
Although the level ups in the next chapter may seem unbelievably lucky, I did not in fact sell my soul to Mephistopheles for good fortune. As proof I point out that Sain and Lyn were hit by pretty much every enemy. Lyn was hit by Dorcas with a handaxe for goodness sake! And Sain got clobbered by brigands while standing on a forest wielding an iron sword. Again and again. By the end of the chapter, they were both at 2-3 HP and I was sure I was going to have to restart and lose all the beautiful levels I'd gained. Fortunately, that didn't happen.
The War Room, Part 4
Previously, I talked about the way weapon stats and character stats function individually. Let's put the pieces together and look at how combat actually works:
Your character's accuracy is: Weapon Hit + (2 x Skill) + (1/2 x Luck) + Weapon Triangle Bonus/Penalty + S Rank Bonus + Support Bonus + Tactician Bonus
I haven't previously talked about the Weapon Triangle so let me sum that up now. Basically, there's a rock-paper-scissors arrangement among the weapons in this game. Lances > Swords > Axes > Lances. There is another rock-paper-scissors for magic: Dark > Anima > Light > Dark. If your weapon is at an advantage vs the defender, you get +15 to your accuracy and +1 to your damage. If your weapon is at a disadvantage you take a penalty of 15 to hit and 1 to damage. These are significant bonuses, but not overwhelming.
Bows and Staves are not affected by the weapon triangle in any way. Likewise there are no bonuses or penalties for using magic vs weapons or vice versa.
Straightforward, right? The one complication is that there are a handful of weapons that reverse the weapon triangle and double its effects. The Lancereaver is a sword which is > lances but < axes, for example. These XReaver weapons have quite powerful stats in general, but they're rare and expensive so I won't use them much if at all.
As I alluded to in the War Room Part 3, the S rank bonus is a +5 bonus to your accuracy if you have an S level mastery with your current weapon.
Support bonuses are not relevant yet, I'll tell you more about them later.
As I mentioned briefly in the prologue part of this LP, the tactician also grants a minor bonus to accuracy and avoid for any character who has the same affinity as him/her. In my case, that's units with the Thunder affinity.
So that's the accuracy formula, now what about the enemy chance to avoid an attack?
Dodge rate = (2x Speed) + Luck + Terrain Bonus + Support Bonus + Tactician bonus.
Note that your functional speed may be decreased if your weapon Weight is > your Con.
So when you attack an enemy, you have a % chance to hit = your accuracy - the enemy's dodge rate, right? Not quite! Let's imagine your accuracy was 100 and the enemy's dodge was 20. The game would tell you that you have an 80% chance to hit, but this would be a lie. You see, the game rolls 2 100 sided dice and averages them to decide whether you hit or not. For example, it might end up with results of 87 and 39. Averaged, that makes 63. 63 is less than or equal to 80, so in this case the attacker would hit. If you know anything about probability though, you'll notice that the chance of getting a result which is approximately close to 50 is higher when rolling 2 dice and averaging them than when just rolling 1 die. This means that if your displayed hit chance is something above 50, you have a higher than displayed real chance to hit. If your displayed chance is something under 50, you have a lower than displayed real chance to hit. This rarely matters, but it's good to know. The following page calculates the true odds to hit for every displayed chance: http://old.serenesforest.net/general/truehit.html
Right. Now let's assume you hit. How much damage do you do?
Damage inflicted = Critical coefficient x {Strength + [Supereffective coefficient x (Weapon Might + Weapon Triangle Bonus)] + Support Bonus - Defense - Terrain bonus - enemy support bonus}.
Looks complicated but it's pretty simple in reality. Basically you deal damage equal to your Strength + your weapon Might - their defense.
If they have good terrain you'll do less. If they have support bonuses you'll do less, if you have support bonuses then you'll do more. If you have a super-effective weapon, then your weapon's might (plus the weapon triangle bonus or penalty of 1) is doubled.
If you're using magic, just subtract the enemy's Resistance instead of defense.
And if you get a critical hit, the damage they would have taken is multiplied by 3. This means crits only really hurt if you're already capable of doing serious damage.
What's your chance of getting a critical hit?
It's = Weapon Critical Bonus + (1/2 x Skill) + Support Bonus + S Rank bonus - Enemy Luck - Enemy Support Bonus - Enemy Tactician bonus
So basically it's 1/2 skill + weapon crit rate - enemy luck.
The Swordmaster and Berserker classes get a bonus of 15 to their crit rates.
The last important thing to know about is who, if anyone, gets a second attack. If one person's functional speed (Speed - any penalty for excessive weapon weight) is greater than the other by 4 or more, then the faster person gets a second attack.
And just as a quick reminder, remember that the order of attacks is as follows:
1) Person on offense
2) Person on defense
3) Faster person, if any
If one person has a Brave Weapon, then they get 2 attacks any time they would get 1.
Chapter Story Summary:
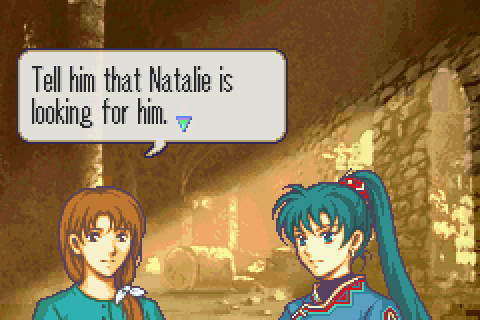
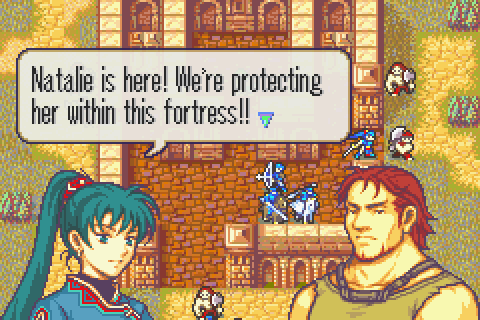
Continuing the long trip toward Lycia, Lyn and company stop for the night at a ruined fortress. They find a woman named Natalie there looking for her husband, Dorcas. As twilight falls, the Ganelon bandits catch up to Lyn's group and attack them, seeking vengeance for the death of Migal.

Here's one of the first good pictures of the map of the continent. You can see that Lyn has come around a long east-west mountain range and is now walking back west along it toward Lycia.
Also let me say that I appreciate that bandits are people with motivations like vengeance for fallen comrades as well as just greed in this game.
Look at that cool picture of the moldering old fortress. There's a nice little tune named Silent Grounds https://www.youtube.com/watch?v=S8AAyScdrF8 that plays during this sequence.
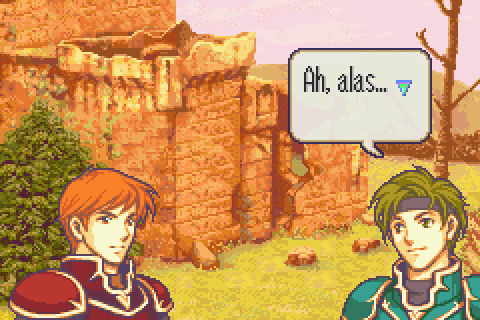
And inside the fort they find a woman named Natalie preparing to spend the night there as she looks for her husband. Also I like that picture of the inside of the fort as twilight falls outside.
AND THEN BANDITS ATTACKED!
The Map:
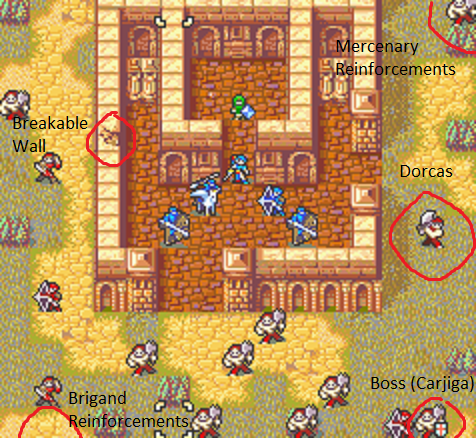
Objective: Keep Natalie (the green unit in the top middle) alive for 7 turns.
Secondary Objective: Recruit Dorcas (an enemy on the right side. If Lyn talks to him and explains that his wife is here in the fortress, he'll switch sides.
Secondary Objective: KILL 'EM ALL
This is the first chapter where you don't really need to kill every enemy to win, just hold them off for a while. But you get valuable XP (and honor and glory) if you rush out and slaughter them all. And there are a LOT of them.
Killing every enemy is complicated somewhat by the fact that two of them start off far away on the west side of the fort, slowly trying to break down the cracked wall to make a 3rd entrance.
Additionally, this is the first chapter where enemy reinforcements join the battle in the middle, so if you want to kill every single enemy, then you'll need to station people near each spawn point.
The Characters
Natalie is Dorcas's wife. She was crippled by a childhood illness (I love that this is the kind of universe where it's acknowledged that a lot of people had serious health problems that you couldn't do much about back in the bad old days). She'll never join the party and in fact is home in Bern for the rest of the story as Dorcas goes out and adventures with you, but you learn a lot about her from their supports and she's decently well fleshed out in this chapter alone.
“It would break Natalie’s sweet heart to see me sink so low.” –Dorcas, Chapter 4
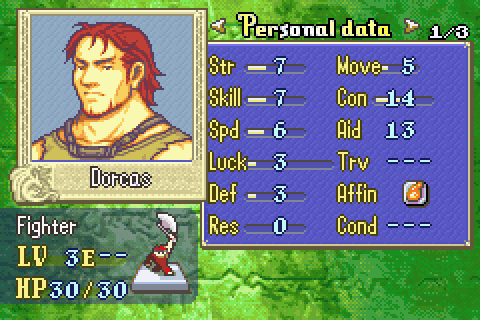
Natalie's devoted husband, he's secretly joined the Ganelon bandits in order to make some money to pay for treatment for her injury. He's a gentle person though and is ashamed to have joined up with such bad company. Dorcas, in contrast to Bartre who will be introduced later, is calm and stoic and quiet. Serene even. He cares nothing for fame and fortune, wanting only to make enough money to pay for medical care for his wife and then return home to live quietly with her.
You pretty much can't not like Dorcas; he's just a decent everyday sort of person. Still, he's not terribly interesting.
He's our first axe user. Generally speaking axes are a very bad early game weapon because of their low accuracy and very good late game weapons because of their huge damage. Dorcas, however, is pretty good at the beginning of the story but is terrible later on. His speed growth is just atrocious and his defense is bad too. So he can't be safely put on the front lines. And massive strength isn't that great when you can't actually double-attack enemies.
All in all, he's pretty much terrible any way you look at him. Still, he'll have his uses early on in Hector's story where he's the only infantryman capable of carrying Hector and his surprisingly decent starting stats will serve him well.
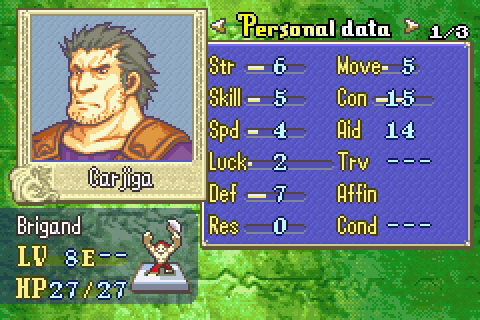
“We’ll avenge Migal and get some pretty souvenirs to boot.” –Carjiga, Chapter 4
Clark Kent just wishes he had a chin that strong. The first optional boss of the game, you can just ignore Carjiga and you'll still win. But where's the fun in that?
Besides wanting plunder (or, you know, slaves in this case) and revenge for Migal, he also is interested in gaining street cred among the Ganelon bandits by being the one who beats Lyn. This causes him to order a glorious and reckless charge on your fortified position instead of a safer but lame sneak attack when night falls properly.

Since Sain had gained a ton of defense, I felt reasonably comfortable charging him into the huge crowd of brigands south of the fort alone. Sain can't quite reach the nearby forest on this chapter, but he needs to loop around to the west side of the fort to aggro the enemies there anyway. Things didn't go quite as planned since Sain got walloped by more brigands than expected. Each had about 60% displayed odds to hit him and almost every one of them did, so he was immediately brought down to dangerously low HP
But look at that amazing level! Good heavens, I hope he doesn't die and force me to restart after a level like that.
Meanwhile, at the eastern door of the fortress, everyone other than Sain is hiding out where the enemies won't attack them while Lyn recruits Dorcas to our cause. Recruiting the enemy characters without killing them or them killing you can sometimes be a bit tricky, but Dorcas is an easy one.

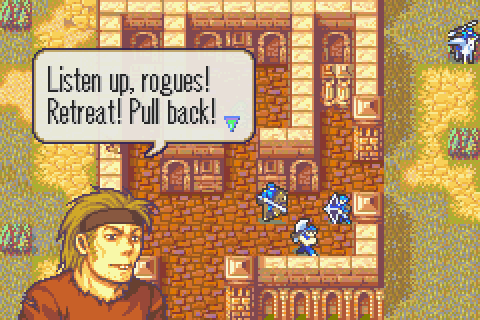
Carjiga calls for more men, triggering the reinforcements that spawn for the rest of the map. The game doesn't always give you a nice warning like that, but (unlike FE6 and Awakening) the enemies generally do not get to move on the same turn they appear, so you always have time to react and change your strategy.

Sain is badly injured. Almost as dangerously, his iron lance is about to break because I've been using him so much. If it breaks, he'll have to switch to his iron sword. Which is better for this purpose but more expensive. I value money more than his life.
As you may recall, I bought an iron lance for Kent last level to replace the one he passed to Florina. Sain needs it now though, so I'll have Kent trade it to him.
Trading seems really simple at first, but cleverly exploiting it is actually key to a LOT of expert strategies. I'll just illustrate one basic use of it here.
In this picture I've brought Kent close to Sain, but I want to keep him out of enemy range so he doesn't aggro any of them himself.

Kent moves in and I trade.

Now this is important: because Kent is a mounted unit, he can continue moving after trading or rescuing someone. In this case, this lets him immediately scramble back out of the enemy attack range. So Sain gets his new weapon and no enemies are diverted to attack the wrong target. However, I'll probably need to use Sain's iron sword at least a little bit to keep him alive for the rest of this level since he's so injured. Oh well.

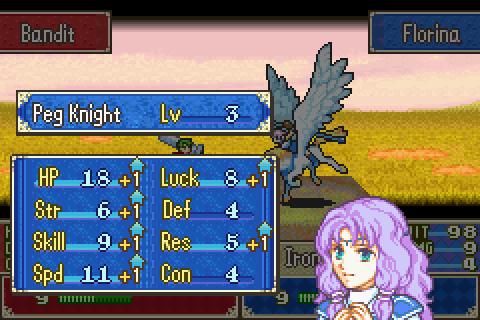
You may have noticed that Florina was offscreen in that picture. She's up in the top left corner, killing the mercenaries who spawn there. With her iron lance, she can kill them in 2 hits and they barely scratch her. This is some of the best training available for Florina right here.
And that level up looks kind of meh at first glance, but Florina really does need more speed at this point to overcome her weapon weight penalty, so it's alright.

Lyn cuts down an archer and moves in to kill Carjiga. Unfortunately, she got hurt by Dorcas and the archer, so she's one hit from death. Fortunately, Carjiga has a forest next to him so she SHOULD be fine.
Not a good level up, but I don't care since Lyn isn't an important character for me. I just need to get her to high level to unlocked Linus's version of Four-Fanged Offense; it doesn't matter if she's actually GOOD or not when she gets there.
Florina shows Lyn how it's done. Fantastic. The most important stats for her to gain at this time are probably Strength, Defense, and Speed in that order.

Now that she had an example of a good level up to look at, Lyn understands what she has to do as she strikes down Carjiga.
And that's a wrap! Every single enemy is dead as the map ends, even the reinforcements who pop up on the last turn. So... who is this guy and who does he think he's talking to? Such minor issues aside, I do want to point out that if Carjiga is still alive, then there's different end of level dialogue. Most of these survival levels end differently depending on how many enemies are left or whether you killed the boss or not.
The next chapter is a bit less interesting than this one, but it's good training.